English ∙ Hrvatski
The dashcam-pi project is a compact car dash camera for recording driving, and it can also be used as a network camera for video surveillance, potentially as an action camera or as a baby monitor. I used a Raspberry Pi Zero 2 W for this project, but any version of Raspberry Pi that supports the camera module can be used. The main strength of this project lies in the software, so I developed a Python script to control the dash camera, from live preview, video recording, and taking pictures to browsing the recorded material on the SD card.
Below is a tutorial on how to set up the Raspberry Pi for this project, install and optionally customize the Python script, control the camera, and share the recorded material over the network.
The core of the project is the Raspberry Pi Zero 2 W and the Raspberry Pi Camera Module 3 Wide, but any other version of Raspberry Pi that supports one of the available camera modules and Wi-Fi can be used. The newer the version of the Raspberry Pi, the better and more fluid the performance will be. Using the Zero 2 W provides a compact solution. Additionally, the newer camera offers better image quality and higher resolution. I chose the Camera Module 3 Wide because the Wide version has a wider field of view, which is quite important for a dash camera. Wi-Fi is important for connecting to a PC, configuring, uploading Python code, controlling the camera over the network, and downloading recorded files from the SD card. It is also desirable to have an SD card with as large a capacity as possible.
For powering the project, I use a USB in the car, either built-in or through a 12V charger, and a power bank can also be used.
| Used Components |
|---|
| 1x Raspberry Pi Zero 2 W |
| 1x Raspberry Pi Camera Module 3 Wide |
| 1x Raspberry Pi Zero Camera Adapter |
| 1x power bank |
| 1x 12V USB car charger |
| 1x long USB cable for connecting the power bank / car charger to the Raspberry Pi |
| 4x 2.5 mm and 4x 2 mm screws, washers and nuts for assembling in a 3D printed case |
When connecting the Raspberry Pi to the camera module, the riskiest part is correctly orienting the cable, as attention must be paid to the position of the cable pins and the connector on the Raspberry Pi. The rest is relatively simple; for power, it is best to connect the USB cable to the micro USB connector marked with PWR.
The case for this dash camera is my own design and 3D printed. It has larger openings for access to the SD card and USB connectors just in case, and screws and nuts are only used to fix the board and camera in the case.
Components during assembly and the final assembled project:


The plastic case I designed can be downloaded and printed on a 3D printer, matching the dimensions of the components I used. I created it using Sketchup, and in /resources, you can find the original skp file and stl files for 3D printing.
.stl files:
After the components are connected, the next step is configuring the Raspberry Pi.
In this part, it is assumed that the Raspberry Pi OS is already installed, for example, using the Raspberry Pi Imager, so that part is not covered in the tutorial. Also, a pi user with a password is created during installation, and this user is used in the following steps. I usually do not use the Raspberry Pi when connected to a monitor but connect and configure it in headless mode. This can complicate the work a bit initially, but later it boots faster when the GUI is turned off. It is important to set up which Wi-Fi it connects to and what its fixed IP address will be.
To be able to connect to it over the home Wi-Fi, first, a blank file named ssh without an extension needs to be created in the root of its SD card:
![]()
Also, in the root of the SD card, create a file named wpa_supplicant.conf where the data for connecting to Wi-Fi Access Points will be filled in. If it will only connect to the home Wi-Fi, one entry is enough, but it is best to enter the home AP SSID as a lower priority connection and the mobile AP SSID as a higher priority to which the Raspberry will connect when used in live mode in the car. The content of the file should be:
country=YOUR_COUNTRY_CODE
ctrl_interface=DIR=/var/run/wpa_supplicant GROUP=netdev
update_config=1
network={
    ssid="YOUR_HOME_WIFI_SSID"
    psk="YOUR_HOME_WIFI_PASSWORD"
    key_mgmt=WPA-PSK
    priority=0 #lower priority
}
network={
    ssid="YOUR_MOBILE_WIFI_SSID"
    psk="YOUR_MOBILE_WIFI_PASSWORD"
    key_mgmt=WPA-PSK
    priority=1 #higher priority
}
Under YOUR_COUNTRY_CODE, put the country code (mine is HR), under YOUR_HOME_WIFI_SSID, put the home Wi-Fi SSID, and in YOUR_HOME_WIFI_PASSWORD, put the network password. Also, for the mobile Wi-Fi that is started for sharing on the mobile phone, enter the SSID YOUR_MOBILE_WIFI_SSID and the password YOUR_MOBILE_WIFI_PASSWORD. Here it is obvious that security is not at a high level, but at least the Raspberry will connect to the network during boot. The intention is to connect to the mobile AP if it is started; otherwise, to the home one, but a few more steps will be needed for that. The next step is to find the IP address it received on the network after the Raspberry boots, which can usually be found by connecting and checking on the home router. This is important for testing in home conditions or, for example, for video as a surveillance camera if it will not be in the car.
Connect via its IP address using Putty; simply enter the SSH connection with the Raspberry Pi's IP address, and when prompted, enter the username and password. After connecting, you immediately get a shell, and then you need to run the Raspberry Pi OS configuration:
sudo raspi-configYou get the Configuration Tool screen, and through it, you must set autologin with the pi user (set the default user) for later automatic startup of the project's Python script:

You must also enable the SSH server:

Among other options, the most important is to turn off the Desktop GUI and login on the config screen, leaving the text console and login to speed up the boot.

After exiting raspi-config, you need to set a static IP address so you don't have to search for the IP every time the Raspberry connects to the router. To do this, edit the /etc/dhcpcd.conf file; among the editors through the shell, I mostly use pico:
sudo pico /etc/dhcpcd.confIn the file, you need to find this part where the static IP address is configured; initially, all lines in the file are commented out with #. Uncomment the lines as in the example and modify them according to the router's address and the desired fixed IP address:
# Example static IP configuration:
interface wlan0
static ip_address=<YOUR_RASPBERRY_IP>/24
#static ip6_address=fd51:42f8:caae:d92e::ff/64
static routers=<YOUR_ROUTER_IP>
static domain_name_servers=<YOUR_ROUTER_IP> 8.8.8.8
Under <YOUR_RASPBERRY_IP>, put the desired fixed address through which you will connect to the Raspberry, it can also be the one it first automatically connected to the router, and under <YOUR_ROUTER_IP>, put the router's IP address, for example, some automatically have 192.168.0.1, and that address does not change. Save the changes and exit the editor.
The continuation of the necessary network settings for connecting to Wi-Fi is through the nmtui tool when run through the shell:
sudo nmtuiConfigure the connection for the home Wi-Fi and add for the mobile Access Point, setting a fixed IP address for both, which will be for the Raspberry as it will be accessed through it and the interface for controlling the dash camera:


On the mobile Access Point under IPv4 CONFIGURATION, you can set automatic address assignment if you are unable to connect, but in that case, after connecting the Raspberry to the mobile phone, you need to manually find the IP address (on Android, I use Network Analyzer).
After the changes, restart the Raspberry:
sudo shutdown -r nowTo review connections, additional configuration, and manual connection, I will use the nmcli tool through the shell; a review of the Wi-Fi connections set in nmtui can be obtained through:
sudo nmcli connectionIn the result, find the UUID added for the mobile AP hotspot as its priority will be raised in the next command; set HOTSPOT_UUID to the hotspot's UUID:
sudo nmcli connection modify HOTSPOT_UUID connection.autoconnect yes connection.autoconnect-priority 100If you want to try automatic connection to that AP during Raspberry boot, you need to restart it. The list of available Wi-Fi networks and their SSIDs can be obtained using:
sudo nmcli dev wifi listIf a new AP network has appeared or the existing one is not visible because the Raspberry did not find it during boot, it is necessary to rescan the available ones:
sudo nmcli dev wifi rescanTo subsequently connect to an AP, i.e., change the active AP, which is good for use when you want to connect to a mobile hotspot, you need to initiate the connection; instead of YOUR_MOBILE_WIFI_SSID, set the hotspot's AP:
sudo nmcli dev wifi connect YOUR_MOBILE_WIFI_SSIDBoth previous commands will be added later to the Raspberry boot procedure before starting the Python script.
⚠️ When the dash camera interface is active, switching between networks or turning the mobile AP hotspot on / off can be challenging as the interface is accessed via the IP address through the browser. If the interface cannot be accessed after turning the hotspot on / off, it means the Raspberry did not connect, so a restart is needed as the interface cannot be accessed otherwise.
Before installing other packages and libraries that will be used in the source code, it is best to update the existing ones:
sudo apt update
sudo apt upgrade
Python is already installed on the OS (check the version with sh python --version, it is best to have the latest version), so the next step is to install the libraries that will be used in the source code. I will also use pip, which if not present, also needs to be installed.
sudo apt install python3-pipSince the Python script will raise a web server, the Flask installation is also needed if not present (check existence with sh pip list | grep Flask):
sudo apt install python3-flaskThe Picamera2 library is used in the source, so it also needs to be installed:
sudo apt install python3-picamera2The camera will record video in mp4 format, so the ffmpeg library installation is needed:
sudo apt install ffmpegFor network sharing, Samba is used, so its installation is needed if not present:
sudo apt-get install sambaFor uploading and downloading files (Python code, used resources, recorded videos, and pictures) on the Raspberry's SD card while on the network, it is best and most practical to use the FTP protocol with a free client like FileZilla. Therefore, the FTP server needs to be installed through the shell:
sudo apt install vsftpdAfter installation, configure the FTP server by editing the /etc/vsftpd.conf file:
sudo pico /etc/vsftpd.confIn the file, find these commented lines and uncomment them by removing #:
#write_enable=YES
#local_umask=022
#anon_upload_enable=YES
Add the following line at the end of the file:
user_sub_token=$USERRestart the FTP daemon:
sudo service vsftpd restartThe next step is to create directories for the dashcam-pi project. Position yourself in /home/pi, the home directory of the logged-in user (I use the default pi), and create the dashcam-pi directory in it. Then, in the dashcam-pi directory, create its subdirectories src and DCIM. In DCIM, create subdirectories PHOTO, THUMB, and VIDEO; if they are not created now, they will be created during the first run of the Python script. In the src directory, copy all the files located in the /src directory of this tutorial. After creating and copying the sources, the directory structure should look like this:
/home/pi/dashcam-pi
├── DCIM
| ├── PHOTO
| ├── THUMB
| └── VIDEO
└── src
├── dashcam-pi.py
├── favicon.png
├── gallery.html
├── index.html
└── styles.css
Details about the files in the src directory are provided below where I analyze the Python script.
After creating this directory structure, it is important to add the recorded material located in the project's DCIM directory to the Samba share, edit the Samba configuration:
sudo pico /etc/samba/smb.confAdd the share parameters at the end of the file:
[dashcam]
comment = dashcam-pi shared folder
browseable = yes
writable = yes
path = /home/pi/dashcam-pi/DCIM
guest ok = yes
only guest = yes
read only = no
create mask = 0777
directory mask = 0777
public = yes
force user = pi

[nobody]
browseable = no
As you can see, the path to the DCIM directory is important because I only want to share it. When configuring Samba, it is important to set the forced user with which to connect to the share because the directories of the share are created through that user, visible in the file under sh force user = pi. Also, if a directory named nobody appears on the network share when connecting to the Raspberry Pi, it is necessary to hide that directory in /etc/samba/smb.conf, just add it at the end of the file as in my example:
[nobody]
browseable = no
In the /etc/samba/smb.conf file, you should also check the workgroup and set it to the one the Raspberry Pi is in; the default workgroup in the file is fine for me because it is the same as the one my computer is in, which I use to access the Raspberry share:
workgroup = WORKGROUPAfter all the changes to the configuration, restart the Samba service:
sudo systemctl restart smbd.serviceAfter the restart, it should be possible to access the network share at the IP address <YOUR_RASPBERRY_IP> set during the Raspberry Pi configuration, for example, this is my case:

In the /src directory, there is only one Python script dashcam-pi.py, the source that runs this project. The script contains a web server and an interface for controlling the Raspberry Pi dash camera. The interface is actually the content of the index.html page loaded by the Python script, and it contains buttons for controlling the Raspberry Pi camera, live preview/ of the camera, and a gallery of recorded material. The gallery is linked to gallery.html, the styles of both HTML interface pages are in styles.css, and additionally, the page icon in the browser is favicon.png.
The complete Python source code dashcam-pi.py looks like this:
"""
  DashCam Pi - Raspberry Pi car dash camera web app project

  Author: Darko Golner
    https://www.darko-golner.com
    https://.com/dgolner
"""

import io
from picamera2 import Picamera2
from picamera2.encoders import H264Encoder
from picamera2.encoders import MJPEGEncoder
from picamera2.encoders import Quality
from picamera2.outputs import FileOutput
from picamera2.outputs import FfmpegOutput
import socketserver
import threading
from threading import Condition
from http import server
import os
import datetime
import time
from PIL import Image

# global variables
camera_enabled = True
 = False
recording = False
global recording_thread
folder = '../DCIM/'

# make new directories if they don't exist
cmd = 'mkdir -p ' + folder + 'PHOTO ' + folder + 'VIDEO ' + folder + 'THUMB'
fp = os.popen(cmd)
fp.close()

# get my IP address
cmd = 'ip addr show wlan0 | grep global | grep inet | awk \'{print $2}\''
fp = os.popen(cmd)
IPAddr = fp.read()
fp.close()
IPAddr = IPAddr[:IPAddr.index('/')]

# get index.html template content
page = ''
with open('index.html', 'r') as f:
  page = f.read()

# web video  content
class Output(io.BufferedIOBase):
  def __init__(self):
    self.frame = None
    self.condition = Condition()

  def write(self, buf):
    if buf.startswith(b'\xff\xd8'):
      with self.condition:
        self.frame = buf
        self.condition.notify_all()

# HTTP request handler
class Handler(server.BaseHTTPRequestHandler):
  def do_GET(self):
    global page
    global camera_enabled
    global
    global recording
    global recording_thread
    global folder
    # base path redirects to index.html
    if self.path == '/':
      self.send_response(301)
      self.send_header('Location', '/index.html')
      self.end_headers()
    elif self.path == '/index.html':
      # substitute custom html tags with paths and text in user interface template (index.html content)
      content = page
      if camera_enabled:
        content = content.replace('\'<!--##VISIBILITY##-->\'', 'visible') \
                  .replace('\'<!--##ERROR##-->\'', 'hidden')
      else:
        content = content.replace('\'<!--##VISIBILITY##-->\'', 'hidden') \
                  .replace('\'<!--##ERROR##-->\'', 'visible')
      if :
        content = content.replace('<!--##HREF_PREVIEW##-->', '/stop_') \
                  .replace('<!--##BUTTON_PREVIEW##-->', 'STOP PREVIEW') \
                  .replace('<!--##IMG_STREAM##-->', '<img src="stream.mjpg" alt="camera preview">')
      else:
        content = content.replace('<!--##HREF_PREVIEW##-->', '/start_') \
                  .replace('<!--##BUTTON_PREVIEW##-->', 'START PREVIEW')
      if recording:
        content = content.replace('<!--##HREF_RECORD##-->', '/stop_recording') \
                  .replace('<!--##BUTTON_RECORD##-->', 'STOP VIDEO')
      else:
        content = content.replace('<!--##HREF_RECORD##-->', '/start_recording') \
                  .replace('<!--##BUTTON_RECORD##-->', 'START VIDEO')
      content = content.encode('utf-8')
      self.send_response(200)
      self.send_header('Content-Type', 'text/html')
      self.send_header('Content-Length', len(content))
      self.end_headers()
      self.wfile.write(content)
    elif self.path == ('/start_'):
      if not :
        # start video stream (live preview) using  encoder and lower resolution camera image stream
        camera.start_recording(encoder = _encoder, output = FileOutput(output), name = 'lores')
        time.sleep(0.2)
         = True
      self.send_response(302)
      self.send_header('Location', '/index.html')
      self.end_headers()
    elif self.path == '/start_recording':
      if not recording:
        # start video recording in separate thread
        recording = True
        recording_thread = threading.Thread(target = record_video)
        recording_thread.start()
      self.send_response(302)
      self.send_header('Location', '/index.html')
      self.end_headers()
    elif self.path == ('/stop_'):
      if :
        # stop video stream (live preview)
        camera.stop_encoder(_encoder)
         = False
      self.send_response(302)
      self.send_header('Location', '/index.html')
      self.end_headers()
    elif self.path == '/stop_recording':
      if recording:
        # stop video recording
        recording = False
        recording_thread.join()
      self.send_response(302)
      self.send_header('Location', '/index.html')
      self.end_headers()
    elif self.path == '/take_photo':
      # define picture filename from timestamp
      x = datetime.datetime.now()
      filename = folder + 'PHOTO/dcp_' + x.strftime('%Y%m%d%H%M%S') + '.jpg'
      # save picture from main camera image stream and make its thumbnail copy
      save_with_thumbnail(filename)
      self.send_response(302)
      self.send_header('Location', '/index.html')
      self.end_headers()
    elif self.path == '/restart':
      # restart Raspberry Pi
      stop_video()
      self.send_response(302)
      self.send_header('Location', '/index.html')
      self.end_headers()
      cmd = 'sudo shutdown -r now'
      fp = os.popen(cmd)
      fp.close()
    elif self.path == '/turnoff':
      # shut down Raspberry Pi
      stop_video()
      self.send_response(302)
      self.send_header('Location', '/index.html')
      self.end_headers()
      cmd = 'sudo shutdown now'
      fp = os.popen(cmd)
      fp.close()
    elif self.path == '/stream.mjpg' and :
      # get and return video stream content
      self.send_response(200)
      self.send_header('Age', 0)
      self.send_header('Cache-Control', 'no-cache, private')
      self.send_header('Pragma', 'no-cache')
      self.send_header('Content-Type', 'multipart/x-mixed-replace; boundary=FRAME')
      self.end_headers()
      # read and return video stream output buffer
      try:
        while True:
          with output.condition:
            output.condition.wait()
            frame = output.frame
          self.wfile.write(b'--FRAME\r\n')
          self.send_header('Content-Type', 'image/jpeg')
          self.send_header('Content-Length', len(frame))
          self.end_headers()
          self.wfile.write(frame)
          self.wfile.write(b'\r\n')
      except Exception as e:
        pass
    elif self.path == '/favicon.png':
      # get and return favicon.png
      self.send_response(200)
      self.send_header('Content-Type', 'image/png')
      self.end_headers()
      with open(self.path.replace('/', '', 1), 'rb') as f:
        self.wfile.write(f.read())
    elif self.path == '/styles.css':
      # get and return styles.css
      self.send_response(200)
      self.send_header('Content-Type', 'text/css')
      self.end_headers()
      with open(self.path.replace('/', '', 1), 'rb') as f:
        self.wfile.write(f.read())
    elif self.path == '/gallery.html':
      # get gallery.html content and substitute custom html tag with list of paths to videos and pictures
      with open('gallery.html', 'r') as f:
        content = f.read()
      content = content.replace('<!--##IMG_GALLERY##-->', get_files())
      content = content.encode('utf-8')
      self.send_response(200)
      self.send_header('Content-Type', 'text/html')
      self.send_header('Content-Length', len(content))
      self.end_headers()
      self.wfile.write(content)
    elif folder.replace('..', '') in self.path and '.jpg' in self.path:
      # get and return .jpg file from corrected path
      self.path = self.path.replace('/', '../', 1)
      self.send_response(200)
      self.send_header('Content-Type', 'image/jpeg')
      self.end_headers()
      try:
        with open(self.path, 'rb') as f:
          self.wfile.write(f.read())
      except Exception as e:
        pass
    elif folder.replace('..', '') in self.path and '.mp4' in self.path:
      # get and return .mp4 file from corrected path
      self.path = self.path.replace('/', '../', 1)
      self.send_response(200)
      self.send_header('Content-Type', 'video/mp4')
      self.end_headers()
      try:
        with open(self.path, 'rb') as f:
          self.wfile.write(f.read())
      except Exception as e:
        pass
    else:
      # for unknown path, redirect to index.html, it's better than return code 404
      self.send_response(302)
      self.send_header('Location', '/index.html')
      self.end_headers()

#  server class
class Server(socketserver.ThreadingMixIn, server.HTTPServer):
  allow_reuse_address = True
  daemon_threads = True

# capture picture from main camera image stream and make its thumbnail copy
def save_with_thumbnail(origin):
  thumb = origin.replace('PHOTO', 'THUMB')
  camera.capture_file(origin)
  img = Image.open(origin)
  img.thumbnail((160, 90), Image.NEAREST)
  img.save(thumb)

# capture video using recording encoder and main high resolution camera stream
def record_video():
  global recording
  global folder
  x = None
  d = 0
  # recording flag that stops this loop is set from the main thread
  while recording:
    y = datetime.datetime.now()
    if x is not None:
      d = (y - x).total_seconds()
    if x is None or d > 60:
      # every video file contains 60 seconds of recording
      x = y
      filename = folder + 'VIDEO/dcp_' + x.strftime('%Y%m%d%H%M%S') + '.mp4'
      try:
        camera.stop_encoder(recording_encoder)
      except:
        pass
      camera.start_recording(encoder = recording_encoder, output = FfmpegOutput(output_filename = filename, audio = False), quality = quality, name = 'main')
      # every video file gets its thumbnail picture for gallery
      save_with_thumbnail(filename.replace('VIDEO/dcp_', 'THUMB/dcpvid_').replace('.mp4', '.jpg'))
    time.sleep(2)
  camera.stop_encoder(recording_encoder)

# stop video recording
def stop_video():
  global camera_enabled
  if camera_enabled:
    camera.stop_recording()
    camera.stop()

# get list of videos and pictures from DCIM subfolders and return as gallery content
def get_files():
  files = ''
  # list all dcp_*.jpg and dcp_*mp4 files in DCIM folder and its subfolders excluding THUMB subfolder, extract timestamp, path name, then sort from newest to oldest file, return path with filename
  cmd = 'find .. -type f \( -iname "dcp_*.jpg" -o -iname "dcp_*.mp4" -path "*/DCIM/*" \) \( -not -path "*/THUMB/*" \) -printf "%T@\t%p\n" | sort -n -r | cut -f2-'
  fp = os.popen(cmd)
  for line in fp:
    if '.mp4' in line:
      files = files + '<video wihth="160" height="90" controls preload="none" poster="%s"><source src="%s" type="video/mp4"></video>\n' %  \
        (line.replace('VIDEO', 'THUMB').replace('dcp_', 'dcpvid_').replace('.mp4', '.jpg'), line)
    if '.jpg' in line:
      files = files + '<img wihth="160" height="90" src="%s" alt="photo">\n' % line.replace('PHOTO', 'THUMB')
  fp.close()
  return files

# Raspberry Pi camera module settings for main high resolution stream and lower resolution stream
# main stream is for video and pictures, lores is for web
# change resolutions and quality for your purposes
try:
  camera = Picamera2()
  output = Output()
  main_stream = {'size': (1920, 1080)}
  lores_stream = {'size': (640, 360), 'format': 'YUV420'}
  config = camera.create_video_configuration(main_stream, lores_stream, encode = 'lores')
  camera.configure(config)
  camera.start()
  _encoder = MJPEGEncoder()
  _encoder.quality = 20
  recording_encoder = H264Encoder(10000000)
  quality = Quality.VERY_HIGH

  # uncomment these lines if you want to start video recording right away
  #recording = True
  #recording_thread = threading.Thread(target = record_video)
  #recording_thread.start()
except Exception as e:
  camera_enabled = False
  print(e)

# start  server
try:
  address = ('', 8000)
  print('IP address http://%s:%s' % (IPAddr, address[1]))
  server = Server(address, Handler)
  server.serve_forever()
finally:
  stop_video()
After studying the source code, you need to run it through the shell (be sure to be positioned in the /src directory):
python dashcam-pi.pyWhen the script is run, it first creates the DCIM directory structure for the recorded material if the directories do not exist, retrieves the Raspberry Pi's IP address, and loads the index.html template for the dash camera control interface (GUI).
The most important part of the startup is actually at the end of the script, initializing the camera and defining the settings for the main/high-resolution stream and the secondary/lower resolution (lores) stream. The main stream is used for video recording and taking pictures, while the lores stream is for live preview, i.e., video in the browser. The resolution of the main stream is 1920x1080 px and can be freely changed along with the encoding quality; higher resolution takes up more space on the SD card but also puts more load on the Raspberry Pi. The lores stream has a much lower resolution also for performance reasons, not only for the Raspberry Pi load but also for network bandwidth.
If an error occurred during configuration or the cable is connected incorrectly, an error will appear, for example:
[0:06:00.891324439] [918]  INFO Camera camera_manager.cpp:325 libcamera v0.3.2+27-7330f29b
list index out of range
By interrupting the program (Ctrl+C), you will see the entire error stack, for example:
^CTraceback (most recent call last):
  File "/home/pi/dashcam-pi/src/dashcam-pi.py", line 328, in <module>
    server.serve_forever()
  File "/usr/lib/python3.11/socketserver.py", line 233, in serve_forever
    ready = selector.select(poll_interval)
            ^^^^^^^^^^^^^^^^^^^^^^^^^^^^^^
  File "/usr/lib/python3.11/selectors.py", line 415, in select
    fd_event_list = self._selector.poll(timeout)
                    ^^^^^^^^^^^^^^^^^^^^^^^^^^^^
When everything goes correctly during startup and configuration, an output like this will appear:
[0:00:39.474500400] [734]  INFO Camera camera_manager.cpp:325 libcamera v0.3.2+27-7330f29b
[0:00:39.646159775] [748]  WARN RPiSdn sdn.cpp:40 Using legacy SDN tuning - please consider moving SDN inside rpi.denoise
[0:00:39.651449827] [748]  INFO RPI vc4.cpp:447 Registered camera /base/soc/i2c0mux/i2c@1/imx708@1a to Unicam device /dev/media3 and ISP device /dev/media0
[0:00:39.651673473] [748]  INFO RPI pipeline_base.cpp:1126 Using configuration file '/usr/share/libcamera/pipeline/rpi/vc4/rpi_apps.yaml'
[0:00:39.671712952] [734]  INFO Camera camera.cpp:1197 configuring streams: (0) 1920x1080-XBGR8888 (1) 640x360-YUV420 (2) 2304x1296-SBGGR10_CSI2P
[0:00:39.672989931] [748]  INFO RPI vc4.cpp:622 Sensor: /base/soc/i2c0mux/i2c@1/imx708@1a - Selected sensor format: 2304x1296-SBGGR10_1X10 - Selected unicam format: 2304x1296-pBAA
The web server is immediately started at the IP address <YOUR_RASPBERRY_IP> and port 8000, so you can access the interface from the browser via the URL http://<YOUR_RASPBERRY_IP>:8000 (visible in the script execution output).

The web server immediately serves index.html as the GUI template in which the tags within the HTML are replaced with paths to individual functionalities or resources. Each button is a path to one of the functionalities, visible in the do_GET method of the Handler class. The same method retrieves and returns a resource (visible by parsing self.path and the exact file names or extensions, e.g., html, css, png, mp4, jpg), then the content of the resource is returned as a response. A slightly specific resource is stream.mjpg because its frames are retrieved from the pipeline.
/start_ if live preview is not already started, it starts recording on the lores stream of the camera, which uses a lower resolution. The output is Output, whose frames are displayed as the stream.mjpg resource. Such a video should immediately appear on the page in the browser. If the browser is closed, still works. It can also be opened separately in one of the players, e.g., VLC as a network stream, which is interesting for using the project for other purposes. How to open it in VLC:

/stop_ if live preview is started, it stops the lores stream of the camera, and stream.mjpg is no longer visible.
/start_recording starts video recording from the main stream of the camera into a file. Since recording is a continuous process, it should not block the web server, so the record_video method is called in a thread for recording. The record_video method creates a video file in which the main stream of the camera is saved and runs in a loop that will be stopped by a flag for stopping recording. While video recording is in progress, a new video file is created every 60 seconds, the intention is to split the recording, not to have one large file with the entire video session. It can be seen that a thumbnail jpg photo is saved and created for each new video, which will be used in the gallery of recorded material.
/stop_recording sets the flag to stop video recording and stops the record_video method that was running in the thread.
/take_photo will start taking a photo from the main stream and also save a thumbnail version of the photo for display in the gallery.
/restart stops all recordings and restarts the Raspberry Pi.
/turnoff stops all recordings and shuts down the Raspberry Pi. After that, the Raspberry must be manually restarted if it is to be used again.
/gallery.html calls the gallery.html template in which the gallery content tag is filled with a list of recorded material from the DCIM directory. Thumbnails saved during their recording are displayed for videos and photos instead of the full materials. Videos can be played, but depending on the network bandwidth, this can be quite demanding.
Since recording does not start automatically at the initial script startup, you can freely uncomment the lines that will automatically start it. With a few modifications, live preview can be automatically started, useful if the dash camera will be used as, for example, video surveillance.
With some tweaking of the recording parameters (if desired), it is good to monitor the Raspberry Pi's load while the project is in analysis and testing locally on the table.
My example of the Raspberry Pi load while dashcam-pi.py is running looks like this when using the htop command:
htopLive preview and video recording running:
Only live preview running:
Only video recording running:
Only the interface running without recording:
If everything still looks okay, you can continue assembling the project. 😃
Manual execution makes sense only during development and testing. Now it's time to add the Python script to the Raspberry Pi's boot procedure. To automatically execute the script during boot, modify the /etc/rc.local file:
sudo pico /etc/rc.localPosition yourself before the exit 0 line and add the following lines:
cd /home/pi/dashcam-pi/src
sudo nmcli dev wifi rescan
sudo nmcli dev wifi connect YOUR_MOBILE_WIFI_SSID &
sudo -u pi python dashcam-pi.py > log.txt 2>&1 &
Here, it is additionally visible that after positioning in the directory where the Python script is located, the Wi-Fi is first rescanned and connected to the mobile AP hotspot as mentioned in the previous steps of the tutorial. Also, replace YOUR_MOBILE_WIFI_SSID with the AP hotspot name. If it doesn't connect to the desired one, it will remain connected to the existing one. The & at the end of the command ensures it runs in the background and errors do not interrupt the script execution.
In my case, the file looks like this:

After connecting, the Python script dashcam-pi.py is executed under the pi user (this is mandatory). The output of the script execution is redirected to the log file log.txt to see any startup errors. The & at the end of the line ensures the process runs in the background. If you don't want to log the output to a log file, omit the > log.txt 2>&1 part.
After saving the changes to the /etc/rc.local file, restart the Raspberry Pi via the shell:
sudo shutdown -r nowIf everything went correctly, the Python script will automatically start, and you can access the dash camera interface hosted at the IP address <YOUR_RASPBERRY_IP>. If there is an error in the script, it will be visible in the log.txt file in the same folder.
It's important to note that if you reconnect to the Raspberry Pi via Putty and modify the script, you need to kill the existing process before manually starting the new version. Check the running script via the shell:
ps -fu pi | grep dashcam-piFind the <pid> of the active process from the result and kill it using kill <pid> in the shell.
To start dashcam-pi as quickly as possible, further optimize the Raspberry Pi boot process. Initially, the GUI was disabled during setup via raspi-config, leaving only the text console. Now, reduce the level of visible log messages during boot by modifying the /boot/firmware/cmdline.txt file (if empty, modify /boot/cmdline.txt used in older OS versions):
sudo pico /boot/firmware/cmdline.txtThe file has only one line, so at the end of that line, add a space followed by quiet splash loglevel=0 and another space at the end.
Further speed optimization can be achieved by modifying the /boot/firmware/config.txt file (if empty, modify /boot/config.txt used in older OS versions):
sudo pico /boot/firmware/config.txtI made the following change to disable the audio, which I don't use:
dtparam=audio=offAfter modifying the files, restart the Raspberry Pi via the shell.
Measure the Raspberry Pi boot time manually or using the shell command:
systemd-analyzeThe result might be similar to my example, showing the duration of each segment:
Startup finished in 4.681s (kernel) + 13.620s (userspace) = 18.301s
multi-user.target reached after 13.551s in userspace.
The fewer active services at startup, the faster the Python script for the dash camera interface will start. Measuring from the moment the Raspberry Pi is powered on to the display of index.html in the browser took about 35 seconds in my case.
So far, it can be noticed that preparation is the most important part of the project. The Python script controls the operation of the dash camera, which is assembled in its own case, and once mounted on a windshield mount, it can look like this:


By connecting the dash camera to the car's USB, it immediately connects to the mobile phone's AP hotspot. Then, you need to connect to the assigned IP address via your mobile phone, and the control interface will appear in the browser:


You can then use the live preview, which is useful for framing the shot. And most importantly, you can start recording the video of the drive whenever you want. 😃
An example of my test recorded material: video, photo, and their thumbnails can be seen in the /DCIM directory of the project.
Since there are many commercial solutions on the market, some cheaper and some much more expensive, I tried to compare my Raspberry Pi dash camera with the Garmin Dash Cam Mini 2. They look like this together in real life:

I published a video with comparison footage I made using both cameras on my YouTube channel:
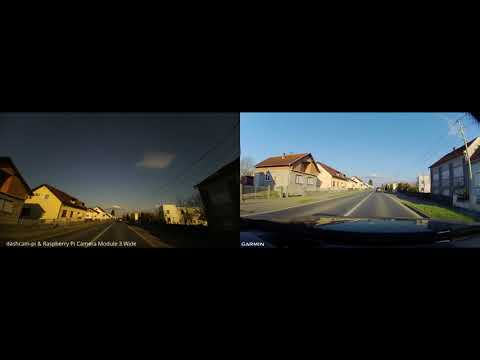
When some technical characteristics are put in a table:
| dashcam-pi on used components | Garmin Dash Cam Mini 2 | |
|---|---|---|
| camera sensor | 12 MP, Sony IMX708 | 2 MP, Garmin Clarity HDR optics |
| used resolution | 1080p | 1080p |
| field of view | 120° | 140° |
| fps | 30 | 30 |
| application | dashcam-pi | Garmin Drive |
| case dimensions | WxHxD: 3.60 cm x 7.70 cm x 2.50 cm | WxHxD: 3.13 cm x 5.33 cm x 2.91 cm |
| boot time | about 35 s | 9 - 18 s |
| power consumption per hour | 400 mAh | 340 mAh |
My personal impression is twofold. I am very satisfied with how I executed the project, especially on the software side, as the application I developed makes it easy to control the camera, even easier than Garmin's application. However, hardware-wise, the Raspberry Pi Camera Module 3 Wide lags behind Garmin. The comparison of footage highlights the difference in the quality of optics and sensors between the Raspberry Pi Camera Module 3 Wide and Garmin's sensor in the dash camera. Considering the price of the Raspberry Pi Camera module, this is still acceptable and certainly useful for personal or home needs. As a variation of the project, one could try using the Raspberry Pi High Quality Camera. I haven't tested it yet, but I would leave that for a future DIY project.
- My Raspberry Pi project raspi-gps
- Headless Raspberry Pi Setup
- Raspberry Pi Configuration
- Raspberry Pi Camera Modules
- The Picamera2 Library
- Raspberry Pi Picamera2 examples
- Samba: Set up a Raspberry Pi as a File Server for your local network
- Make a Pi Zero W Smart USB flash drive
- Host a Wi-Fi hotspot with a Raspberry Pi