fmt Command in Linux
The Linux fmt command formats the text files. It reformats the paragraphs of the text file to fit within the specified width.
The fmt command is a handy tool to format text files to make them more readable in the terminal by adjusting the paragraph lengths.
Table of Contents
Here is a comprehensive guide to the options available with the fmt command −
Syntax of fmt Command
The syntax of the Linux fmt command is as follows −
fmt [-width] [options] [file]
The [-width] field in the above syntax is used to specify the line width. The [-width] is an abbreviated form of --width= digits. The [options] field is used to specify the options to modify the command's behavior. The [file] field is used to specify the file which needs to be formatted. The fmt command reads the standard input if no file is specified.
Options of fmt Command
The options of the fmt command are listed below −
| Flag | Options | Description |
|---|---|---|
| -c | --crown-margin | It preserves the indentations of the first two lines |
| -p string | --prefix= string | It reformates only those lines start with the specified string and reattach the prefix |
| -s | --split-only | It splits the long lines without refilling the text |
| -t | --tagged-paragraph | It formats the paragraphs where the first-line indentation is different from the second-line |
| -u | --uniform-spacing | It ensures one space between words and two after the sentence |
| -w width | --width= width | It sets the maximum line width (default is 75 columns) |
| -g width | --goal= width | It sets the goal width, typically 93% of the maximum width |
| --help | It displays a brief help of the command | |
| --version | It displays the command version |
Examples of fmt Command in Linux
This section demonstrates the usage of the Linux fmt command through various examples −
Setting Line Width
To set the maximum line, use the -w or -width options with digits defining the total number of columns per line. For example, to set the maximum line length equal to 40 characters, use the fmt command in the following way −
fmt -w 40 file.txt
fmt --width=40 file.txt

Formatting Specific Lines
To reformat the lines that are started with a specific string, use the -p or --prefix options:
fmt -p "- " file.txt
fmt --prefix="- " file.txt
The above command attaches the "-" string to each line after the line starting with the "-" as shown in the following output image.

Splitting the Long Lines
To split the long lines, use the -s or --split-only options.
fmt -s file.txt
fmt --split-only file.txt

It does not reformat the paragraphs; it just breaks the long lines, as shown in the output image.
Managing Indentations
If the indentation of the first line differs from the second or subsequent lines, use the -t or --tagged-paragraph option.
fmt -t file.txt
fmt --tagged-paragraph file.txt

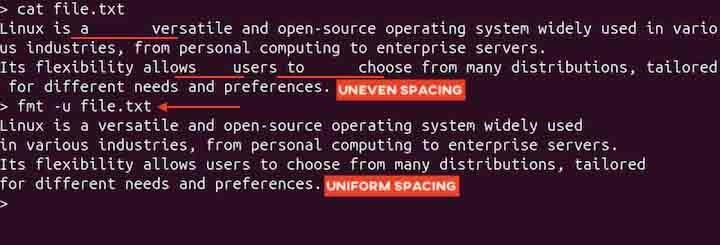
Managing Spacing
To add uniform spacing to the text file, use the -u or --uniform-spacing option. It ensures one space between the words and two between the sentences.
fmt -u file.txt
fmt --uniform-spacing file.txt
Setting Goal
Setting a goal is similar to setting width but less strict. A goal is a typical guideline rather than a limit. The fmt command will try to format the line according to the specified goal. But to avoid the unnecessary line break, the goal limit can be exceeded.
For example, to set the goal equal to 50 characters, use the fmt command in the following way −
fmt -g 50 file.txt
fmt --goal=50 file.txt

Using Multiple Options
Multiple fmt command options can also be used to make the standard output format more readable.
For example, to set the width and make the text uniform, use the command given below −
fmt -u -w 50 file.txt

Conclusion
The fmt command in Linux is used to format paragraphs in a specified file. If the file is not provided, then the command formats the standard input. It is a handy tool to make the text more readable in the terminal.
In this tutorial, we covered the fmt command, its syntax, options, and usage in Linux through various examples.